facebook

Visit Facebook page!

follow on facebook to get instant news and updates.

Thursday 16 April 2015

Fix “This Accessory May Not Be Supported” Error While Charging iPhone / iPad

Do you get an error message on your iPhone or iPad screen after updating iOS to the new iOS 8.1 or iOS 8.1.2? You are not alone.
Many Apple users are complaining that the error This Accessory May Not Be Supported appears right after upgrading to the new iOS and it has nothing to do with the faulty device or cable.
Solution?
As much as we don’t like to tell you this, the problem has to do with the faulty charging cable of your iPhone or iPad.
After going through dozens of pages to find a way to get rid of “accessory may not be support” problem, we have come to the following conclusion:
  • Your iPhone has dust inside the charging port
  • Your cable is faulty or it has dust inside those pins
But iOS 8 update created this problem, right? Yes, you are probably right. We can’t say for sure, but we know what fixes this problem. And so here are 5 solutions that will end the “accessory” issue during iPhone charging almost permanently.
Note: Even if you have OEM apple charger/cable, or a brand new iPhone 6/5s device and its under warranty, you may still face this problem (and the solutions mentioned below will work for you).
Solution 1: Change the cable
Don’t buy a new one. If you have a spare cable (we had iPod Touch cable and it works with our old iPhone 4s), you can always plug it into the power socket and charge your iPhone. Notice if the error still appears. If it doesn’t, you are good. If it does, go through the next solution.
Solution 2: Remove Dust From Apple’s Cable
Lawrence says: “The most common cause of this error when using an Apple or Apple-approved cable is dirt or pocket lint in the lightning cable on the phone. Examine it with a bright light, magnifying glass if needed, and clean it with a wood or plastic toothpick.”
So clean that lighting connector sockets and plugs and try charging your iPhone now. You can always use an old toothbrush to get rid of those internal dust.
Solution 3: Switch ON Airplane Mode
First, connect your iPhone to the charging cable. The error message will appear, so dismiss or ignore it. Next, turn ON the Airplane mode in your device.
Now switch OFF your iPhone. Wait for another 2 minutes and switch it ON again. You will no longer receive the error message.
Solution 4: Change Power Supply
Raymond explains: “Your USB port on your computer may not be providing enough power. My iPhone will charge from my computer, my iPad will not because there is not enough power. Not all USB ports provide the same amount of power.”
So if you are using iPhone 6 Plus or iPhone 6 that will require different power supply, you may want to use a different power source.
Solution 5: Use Bypass Addon
If your iPhone is jailbroken  then you can use Bypass Unsupported Access addon available in Cydia.
The process is simple: Open Cydia, add new repo — canolli.myrepospace.com — and search for the Bypass Unsupported Access. Download and install it to get rid of the error message permanently.

Sunday 5 April 2015

Here’s how Galaxy S6 camera stacks up against iPhone 6 and iPhone 6 Plus

iPhone 6 vs Samsung Galaxy S6
The Galaxy S6 (and Galaxy S6 edge) have been receiving ravishing reviews from various publications. The latest Galaxies are easily the best smartphones Samsung has ever manufactured.
Samsung has also been highlighting how good the 16MP f/1.9 rear camera on the Galaxy S6 is. But how exactly does it stack up against the excellent 8MP shooter found on the iPhone 6 and iPhone 6 Plus?
We take a look at some of the comparison done by other publications to find out.
According to The Verge, the Galaxy S6 camera is “fast, reliable and takes great photos,” and is “easily the best camera on any Android phone ever.” The shooter is also able to hold its own against the iPhone 6 Plus and is able to consistently shoot decent pictures irrespective of the situation.
iPhone 6 vs. Galaxy S6 camera
On the whole, the S6 holds its own against the iPhone, and we wouldn’t hesitate for a second to use it as our primary smartphone camera.
The comparison images from the website shows that the white balance of both handsets differ significantly, they are both able to produce usable photos in various conditions.
In their comparison, Business Insider found that the Galaxy S6 is able to take brighter photos than the iPhone 6 Plus in low-light, but the latter is still able to produce better images as they are sharper.
They even pitted HTC’s latest flagship — the One M9 — against the iPhone 6 and Galaxy S6, but the 20MP module on the handset fell flat on its face due to its tendency to over-expose photos.
The overall winner? The iPhone 6. It took the best photos overall, especially indoors and in low light. The Galaxy S6 was also quite good, coming in very close to the iPhone in most settings. The HTC did spectacularly well in a couple of outdoor settings, but overall seemed to have problems with exposure.
Unlike Business Insider and The Verge, CNET pitted the iPhone 6 against the Galaxy S6 and the HTC One M9. The publication echoed the same thoughts as Business Insider: While the Galaxy S6 took brighter shots in low-light, the iPhone 6 managed to capture more details and produce sharper images.
As for the iPhone, its biggest strength is with low-light environments. Though it won’t have the brightest exposure in the end per se, its photos are sharper and look more natural. It also reduces the amount of lens flare beaming from different light sources. In addition, its white balance captures the purest and cleanest white hues.
Overall though, the publication found that the cameras on the iPhone 6 and Galaxy S6 are equally good, while that on the HTC One M9 is a disappointment.
All in all, the M9 proved a disappointment, while the Galaxy S6 and the iPhone 6 were pretty neck-and-neck. Personally, I’d give the Galaxy S6 the slight edge, since I’m partial to its saturated tones that come off bright without looking too unrealistic (a characteristic that plagued Galaxy cameras before).

It looks like Samsung has finally managed to catch up to Apple in terms of camera performance on its devices. Do keep in mind though that the iPhone 6 and iPhone 6 Plus are six-months old at this point, and the next iPhone is only six-months away at this point, while the Galaxy S6 is going to be Samsung’s flagship handset for the next one year.

Apple launches trade-in program to accept Android smartphones for the iPhone 6, iPhone 6 Plus and iPhone 5s

ios-7-vs-android
Apple today launched its new trade-in program for non-iPhones devices for the first time ever. A report from earlier this month had revealed that Apple was soon going to start accepting trade-ins of Android and BlackBerry powered devices for the iPhone.
The Cupertino company will be giving credit to customers for trading in their Android, Windows Phone or BlackBerry powered handset to buy the iPhone 6, iPhone 6 Plus or the iPhone 5s. It is likely that the company has launched this new trade-in program to further boost the sales of the iPhone 6 and iPhone 6 Plus after a record breaking quarter last year.
According to the retail store pages on Apple’s website, the new trade-in program is currently live in retail stores of the United States, France, United Kingdom and Italy.
Apple had first launched its Reuse and Recycle trade-in program in 2013, and e expanded it to include the iPad last year. The company is also scheduled to reportedly launch a trade-in program in China later this week, though it will only be limited to iPhones

WhatsApp to get voice calling on iPhone within weeks

Whatsapp
WhatsApp has kept us waiting a long time for voice calling, which was first confirmed at Mobile World Congress back in February 2014. But more than a year later, the company promises it will arrive within the coming weeks.
We already know the feature is close; it has been slowly trickling out to Android users for testing over the past couple of months, although you can only get it if you receive a call from another WhatsApp user who already has the feature enabled.
But according to WhatsApp co-founder Brian Acton, who was speaking at the Facebook F8 conference last week on a panel that also included Instagram co-founder Mike Krieger, voice calling will be available to iPhone users very soon.
Acton said WhatsApp has spent the last year ensuring voice calling is the best it can be before bringing it to the service’s 700 million active users. The feature will allow WhatsApp to compete with the likes of Skype, Viber, and others, but it has to be solid to succeed.
WhatsApp’s offering will also have some key advantages: not only is it expected to be completely free (once you’ve paid your $0.99 a year fee), but it is also designed to serve WhatsApp’s millions of users in emerging markets, where only 2G data networks are available.
Acton initially promised that WhatsApp voice calling would be coming to iPhone in a “couple weeks,” but he later told VentureBeat, “Well, several weeks.” Either way, it’s good to know WhatsApp voice calling is coming soon to iOS.

How to reduce your iPhone or iPad’s brightness below default level without jailbreaking

If you use your iPhone or iPad at night, even the lowest level brightness may, at times, feel too bright. Luckily, there’s a way to turn down the brightness even below the minimum level, but that setting is hidden inside iOS’ wide variety of accessibility features.
Here’s how to turn down your iPhone or iPad’s screen brightness below what Control Center allows you:
  • Swipe up from the bottom of the screen, and turn the brightness all the way down from Control Center.
  • Open Settings and navigate to General > Accessibility > Zoom
brightness-1
  • Scroll down, and turn on the “Show Controller” setting.
  • Go back one page, and scroll down go to “Accessibility Shortcut”
  • Select Zoom. You can now access the Zoom menu by triple clicking your home button.
brightness-2
  • Go back to your home screen, and triple click the home button to bring up the Zoom menu. (If you don’t see the menu, tap on the circular controller to bring it up.)
brightness 3
  • Tap on “Choose Filter”, and select “Low Light”.
You’ll see that the screen dims, and is more soothing to the eye. You can dismiss the zoom popover by tapping outside it. You can enable or disable this mode with the triple click shortcut you setup a few steps back.

How to set iPhone speaker as default for incoming calls

Calls to Speaker phone
When I receive a call on my iPhone I’d much rather use my headphones or place the call on speakerphone so I can multitask around the house. While you can switch to speakerphone by tapping the speaker button during a call, what if you would prefer all calls to automatically go to speaker by default? Well it’s actually fairly easy to enable and located right inside your Settings.

How to set iPhone speaker as default for incoming calls

Apple created the Accessibility menu to help people with certain impairments better use Apple devices. Some of those same settings can be enabled to customize the experience for all users as well. To enable default speakerphone follow these steps.
  1. Go to Settings -> General -> Accessibility
  2. Under the Interaction section select Call Audio Routing
  3. Switch from Automatic to Speaker to make speakerphone the default routing for incoming and outgoing calls
  4. Now that we have enabled Speaker for the Call Audio Routing, all calls that you make and receive will be placed on speakerphone, including FaceTime calls. During a call you can switch back to the internal speakers by tapping on the speaker icon, and if you wish to permanently go back to the default speakers, go to Settings -> General -> Accessibility -> Call Audio Routing -> and switch back to “Automatic”.
Would you rather have speakerphone be your default method, or this just a once in a while preference? Let us know your choice in the comment section.
Check our category page for the latest how-to guides and tutorials for your iPhone and iPad.

Jailbreak tweak provides an easier way of silencing incoming calls and alarms

Respond to calls discreetly with a text
Normally, when you receive a phone call on your iPhone, you can silence it by pressing the Power button. The same applies to alarms ringing on your device. Sol is an interesting jailbreak tweak that provides an alternative way of silencing incoming calls and alarms.
With the tweak installed, all you have to do to silence alarms and incoming calls is to flip your device similar to some Android devices. To accomplish this task, the tweak takes advantage of the proximity sensor located on the front of the iPhone, near the front-facing camera.
It also claims that placing your iPhone upside-down on a flat surface will silence all calls and alarms but it doesn’t work. You still have to flip it over to silence incoming alerts.
Sol also comes with a dedicated preferences pane located in the Settings app. From there, you can enable or disable it via the kill switch toggle, choose the sensitivity level of the proximity sensor as well as select whether you want the tweak to work with alarms or not for dismissing or snoozing them.
You can also enable or disable the use for incoming phone calls. Once done, no respring is required for the changes to take place. When you receive a phone call or your iPhone starts ringing, simply flip over your device and it will be silenced right away.
Sol is quite an interesting tweak that doesn’t require you to press the physical Lock button every time you want to silence incoming alerts. It has been inspired from Android devices which feature the same functionality for silencing calls.
If you’re in to give this tweak a try, Sol can be download for free via Cydia’s BigBoss repo. Let us know what you think about the tweak once you’ve installed it.

Purported rear shell of the 4-inch iPhone 6c leaks in photos

iPhone 6c rear shell leaks
The first purported images of the rear shell of the iPhone 6c have made their way to the Internet. The images have been leaked by a Chinese part supplier called Future Supplier. 
From the photos, the rear shell of the iPhone 6c looks very similar to the iPhone 5c, and is made from glossy plastic just like its predecessor. The only two notable changes is a bigger LED cutout to house the dual-LED True Tone flash, and two rows of speaker grilles cutout at the bottom.
iPhone 6c rear shell leaks
The size of the rear housing suggests that the handset will come with a 4-inch screen, which corroborates with the previous rumors about the device.
Apple had launched the iPhone 5c in 2013 alongside the iPhone 5s. The phone did not do particularly well, which forced Apple to not release its successor last year. However, recent reports suggest that the company might launch a iPhone 6c with a 4-inch screen this year to fill the void created by shifting to a larger size screen on the iPhone 6.
As per a previous report that cites sources in Taiwan's handset supply chain, Apple hasn't yet thought of pricing for the iPhone 6C, but it is possible that the unlocked variant in the US gets priced around $400-$500 (approximately Rs. 25,000-31,000).
price-$400-$500 (approximately Rs. 25,000-31,000).

Saturday 4 April 2015

Battery Clip Transistor Tester


When it comes to transistors, I’m a fan of NPNs (versus PNPs) for their ubiquity and reliability, and because I’ve memorized many of their specifications over time. IMG_20140930_104431_detailTransistors come in many types and packages, and I find myself most-often working with TO-92 package bipolar junction transistors – or BJTs. These are the most-common type of transistors, and TO-92 is short forTransistor Outline Package, Case Style 92. This specifies the three-lead design with the component elements encased in plastic or epoxy; one side is curved and the other flat, usually with some information imprinted on the flat side.
I recently prototyped numerous single-, double-, and triple-transistor FM transmitter circuits. However during the prototyping stage – building circuits on breadboards – I encountered numerous circuits that were acting errantly.
Since I was only prototyping the circuits for fun, a number of the components were not bought new, and instead sourced from my junk drawer. I didn’t plan on building more than one of each of the designs, and was merely building several different designs to compare and contrast features of each circuit.
Some quick multimeter probing lead me to suspect the transistors in my circuits. I attempted to use my multimeter’s mini-hooks to attach to the transistor leads inserted in the breadboard, but some leads were obstructed by other components, and I didn’t want to redesign my layouts simply to test the transistors. I wanted a quicker, more-reliable solution. (Plus not all multimeters have ohmmeters for testing transistors, therefore I wanted something that wasn’t multimeter-dependent.)
I needed a standalone transistor tester, a simple tool where I could quickly insert an NPN (or PNP, with an easy redesign) transistor, push a switch, and get confirmation that the transistor’s Collector-Base junction was operating correctly.
Flipping through Charles Platt’s book Make: Electronics – as I often do for inspiration – I stumbled upon Experiment #10, specifically the Fingertip Switching sub-section. The experiment is accompanied by this image:
finger-tip_switch
I thought, “Aha! Of course.” The finger bridges the Collector-Base junction, allowing electricity to flow through the circuit, from the Collector to the Emitter. In this sense the finger is a lot like a switch, or as illustrated on the following page of the book, a finger pushing a momentary button:
base-b-hand
1024px-bjt_npn_symbol_case
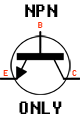
In the layout above it’s quite easy to see the breadboard design, but here the finger is seen pushing a button, accompanied by a few arrows, letters, and a circle. The hand-finger-button is a stand-in for the transistor’s Base, and the whole illustration is a stand-in for the symbol used to represent NPN transistors in a circuit, seen on the left.
A mnemonic for the NPN transistor’s symbol is the arrow is Not Pointing iN; again as opposed to PNP transistors whose symbol arrow Points iN Proudly.
Now back to Platt’s experimental circuit. The fingertip switch experiment had a few things I didn’t want, and was missing a few attributes I did want. It used 12VDC and if I was leaning towards a tool for my workbench I’d prefer a 9V design. It also included no feedback, no indicator light; in other words it worked, but there was no way to know when it was working. I wanted to add an LED to the design.
I got ahead of myself and didn’t realize p.75 of Platt’s book also contains a design for a fingertip switch using an LED, but by then I had sifted through a few resources and sketched a few simple designs. Many are similar, and this is the one I settled on:
fingertip-switch-circuit
You can breadboard this circuit in only a few minutes:
Touch both of the green leads with one finger and the LED will light up.
Of course, I also wasn’t going to keep the circuit permanently mounted on a breadboard. I prefer having a tool that I can quickly reach for whenever I need to test TO-92 package NPN transistors. I sketched a few designs, looked at a few available PC board layouts, and settled on what you see below for this Battery Clip Transistor Tester. I designed it to be small enough to mount directly onto a heavy-duty 9V battery clip (as opposed to the “insulated” clips whose wires are encased in a soft nylon pouch). I hope you enjoy building this super simple tool – if you use a lot of NPN transistors in breadboard or through-hole circuits this tool may save you a lot of frustration.
step5x0

Step #1: Cut the PC Board


  • I settled on this general-purpose PC board because its layout slightly mimicked the layout of a standard breadboard, while simplifying the connections between components. Also with this PC board I could use as few as four rows, which was nearly identical in width to the heavy-duty snap connector!
  • Begin by using a rotary tool with a cut-off wheel. Use a pair of helping hands or vice grip to hold the PC board steady while you cut. Such small cuts require a steady hand and patience. You'll notice I cut through the bottom row of pads on the PC board. It doesn't really matter where you cut, so long as you end up with two pieces, similar to the pieces seen in image 3.
  • The smaller pad is from the outer rows of the PC board, trimmed closely around the copper pads. (I had fun cutting this part to size!)


Step #2: Prepare the PC Board Components

  • Get a 3-pin header, cut and strip the wires. I stripped the wires so the LED would be slightly below the bottom of the 3-pin header (as seen in image 2). If you're a junk collector like me you might have plenty of these things laying around from the era of personal computer desktop motherboards. Any header pins will suffice. Schmartboard's female jumpers (RadioShack #2760144) is another satisfactory part.
  • TIP: if the wires of the 3-pin header are stranded - not solid - I recommend tinning them with solder prior to inserting them in the PC board.
  • Cut and strip three tiny lengths of white, solid-core wire. You'll use two to jump the fingertip switch pad to the Collector and Base of the transistor; and one to jump the Emitter to ground.
  • Mount the resistor, 3-pin header, LED, and fingertip switch pad wires & pad to the PC board; you can see a simplified layout in image 3, or go here for a full-size version of the same diagram. Bend the component leads so you can flip over the PC board and solder the connections.
  • Note: In the next Step's first image my fingertip switch pad is not seen; the pad fell off and the wires fell out, but you can see the pad and solder points in the second image. This part is very small and a bit finicky. Be patient and you'll get it to mount in place properly.
  • Also note: I cut two tiny lengths of blue and yellow heat-shrink tubing for the LED's leads. This is entirely optional. I did this because heat-shrink tubing helps make the leads feel a bit more secure and therefore less likely to bend accidentally.


Step #3: Solder the Component Leads


  • Exercise more patience, and solder the components in place. I wanted all the components as snug and close to the PC board as possible; feel free to check and double-check each component before soldering.
  • When you're done, clip all the leads and you'll have a pretty little circuit board!


Step #4: Connect the Battery Clip Leads and Mount the PCB


  • Curl the battery's snap connector's wires to get an idea of where to cut and strip the wires. I wanted a nice, aesthetic curl, but you could trim these even shorter for a straight run to the PC board.
  • Solder the battery clip leads to the PC board's rails.
  • Apply a small dab of hot glue to the top of the battery clip and firmly press the circuit onto the glue. Hold this in place for a half-minute until the glue dries. You've now assembled a tiny tool for your electronics toolbox!


Step #5: Test a Transistor!


  • First thing is to test a transistor to ensure the tool works properly. Insert an NPN transistor with the TO-92's package imprint facing you; in other words you should be able to read "2N3094" - or whatever type of NPN transistor you are testing - when the transistor is inserted.
  • With the transistor's Collector, Base, and Emitter pins correctly inserted in the 3-pin header, tap the fingertip switch pad and you should see the red LED light up.
  • Not satisfied with having to remember which header pin corresponded with which transistor lead, I printed the symbol for an NPN transistor accompanied by the words "NPN ONLY" and mounted this to the front of the 3-pin header (see image 2).


Smart Boy will turn your iPhone 6 Plus into a Game Boy Color

Hardware developer Hyperkin, the folks behind the Retron 5 gaming console, are making a new peripheral that will turn your iPhone 6 Plus into a Game Boy Color.
Dubbed the Smart Boy, Hyperkin's upcoming peripheral to play Game Boy and Game Boy Color games was originally announced on its Facebook page as an April Fools' Day joke. But secretly, it was testing the demand for such a system and fan fervour was so high that the very next day Hyperkin announced that it would actually get cracking on developing this.
"A lot of you were speculating that the Smart Boy is an April Fools' Joke. Well, it sort of was. We 'leaked' it with the initial intent of testing the market, seeing whether or not it should be something we'd actually make, under the guise of an April Fools' Joke," Hyperkin explained.
"Looks like you awesome folks ACTUALLY WANT IT, so the Smart Boy is now in development!" it added. "Thank you all for your enthusiastic responses!
1
The mock-up blueprint above is only a concept design that may change throughout the Smart Boy's development.
Hyperkin noted that while the Smart Boy is being developed for iPhone 6 Plus, there will be "more compatible smartphones to follow."
Upon its initial announcement, Hyperkin stated that the Smart Boy would include a D-pad, two action buttons, and start and select buttons. It will also include its own battery that can be charged through the phone itself, which should last for roughly five hours.

Why It's So Hard for the CIA to Hack Your iPhone???

Credit: cla78/Shutterstock

The CIA wants to hack your iPhone — but it may be failing in its attempts to do so.
The Intercept, an online magazine, said yesterday (March 10) that the Central Intelligence Agency had targeted the firmware that runs on iPhones and iPads, as well as the software tool with which developers write iOS apps.
Documents provided by former CIA staffer Edward Snowden revealed that the agency has hosted annual "jamborees," secret hacker conferences at which researchers from the CIA, the National Security Agency (NSA) and associated private companies brainstormed and presented the latest cyberespionage tactics.
Despite this group effort, the gist of the Snowden documents posted by The Intercept seems to be that government intelligence agencies have had a lot of trouble cracking iPhone security, and might not be much better at it than anyone else.
"It sounds like the CIA and NSA wait for jailbreaks from the [amateur iPhone hacking] community," Chester Wisniewski, a senior security researcher at the antivirus firm Sophos, told Tom's Guide.
Softening Up the Firmware
CIA researchers tried several methods of attacking iPhone software. The two most promising ones targeted the central processing units (CPUs) of iPhones and iPads, as well as Xcode, the development tool used to create iOS applications.
Each model of CPU that Apple designs is assigned a group ID, or GID, that is used to encrypt the firmware, the low-level software that handles the most basic processes of each device.
A GID is shared by all devices with the same processor. For example, every device that has an A4 chip, whether it's an iPhone, an iPad, an iPod Touch or an Apple TV, will have the same GID. The GID is different from the User ID (UID), which is unique to a single device and is used to encrypt the device user's email and other personal data.
Apple designed its software with this double level of encryption to make sure the user data and the firmware weren't vulnerable to the same attacks, Wisniewski said.
"Whatever you can say about Apple, when they find a problem, they really get into the root cause," Wisniewski said.
The Snowden documents showed that several avenues of attack were to determine a CPU line's GID. One was a "side-channel" attack that analyzed the electromagnetic signals given off by a processor as it encrypted and decrypted information. Another involved physically removing the information from the chip, which Wisniewski said would mean taking apart a processor.
Halfway to Malware
However, discovering the GID does not let you install bogus firmware on an Apple device. You would need to also crack or steal Apple's digital signature, which is a secret private key for the RSA encryption algorithm.
"The reason why the CIA and everybody else is after the GID key is simply because it allows decrypting firmware for reversing purposes," Stefan Essera security researcher at SektionEins, a Cologne, Germany-based company, tweeted yesterday. "It does not allow you to pretend to be Apple. For that, you need to break RSA."
"Reversing" translates the binary data of Apple's firmware into legible code that researchers can analyze and modify. That can help decrypt data on an individual device — but is also the first step in creating malicious firmware to be deployed on multiple devices.
The attempt to get into the firmware shows that the CIA may have been looking at bulk data collection, not just tracking individuals, Wisniewski said.  
"If you care about following the law, the UID is all you care about," he said.
"The UID key is what you'd want to get if you made an arrest and were looking to scrape data off of a suspect's device," Jonathan Zdziarski, an expert on extracting data from iPhones, wrote on his blog yesterday. "[The CIA] is instead more interested in cooking their own low-level boot firmware to potentially deploy across an entire product line of devices."
Robert Graham, the CEO of Atlanta-based Errata Security, disagreed with that assessment, pointing out on his own blog that the CIA is probably most interested in obtaining information from iPhones seized in counterterrorist operations.
"The context of the [GID] presentation wasn't that they wanted to secretly spy on everyone's phones," Graham wrote. "The context was that they wanted to decrypt the phones they were getting."
Like Wisniewski, Zdziarski doesn't think the research was successful.
"This," he wrote, "was a speculative talk, only citing ongoing research, and not an actual deliverable ready to be put into operation."
Tilting at Straw Horses
There may be another way to get spying tools onto lots of iPhones — modifying the development kits used to create iPhone apps.
If the kits could be altered to secretly insert spyware or "backdoors" into apps, then developers might unwittingly spread that malicious software to thousands or millions of Apple devices. Just such a project, code-named Strawhorse, was presented at one of the CIA jamborees by Sandia Labs, a government-owned but privately managed research organization.
Strawhorse aimed to corrupt Xcode, a free tool that many Apple developers use, to insert spyware onto an iOS device — perhaps a program that pulled personal data, emails or photos.
However, the project may not have been successful. One problem, The Intercept noted, lay in the difficulty in persuading developers to use a "whacked" version of Xcode. Any indication that Xcode was compromised would drive programmers to use something else.
"Based on the wording of the document, this was still in the middle stages of development," Zdziarski wrote. "An injection mechanism (the complicated part) does not appear to have been developed yet, as there was no mention of it."
No Joy for the Spies
All this sounds ominous, and it is.
"The implications of this are very serious," Zdziarski wrote. "We are talking about violating Apple's core mechanism for trusting binary code from developers."
But Wisniewski said that from reading the Snowden documents, it isn't clear that the CIA successfully cracked the iPhones. The fact that the researchers were exploring difficult methods such as side-channel attacks and physically attacking the chips may mean that they failed, and is a credit to the company that made the software.
"Someone [at Apple] did something right," Wisniewski said.
It's also possible, he said, that this shows restraint on the part of the CIA, which could have instead stolen the GIDs directly from Apple's corporate network.
"Maybe they were told to not hack American companies," Wisniewski said. "You can bet if it were [Chinese technology giant] Huawei, they'd try it."
The documents given to The Intercept by Snowden are all years old; the "jamborees" cited were held from 2006 to 2011. Apple engineers are now going to be looking for vulnerabilities, just in case the CIA has made any progress.
"I'd really hate to be a software developer at Apple right now," Wisniewski said. "They're going to have to work extra hard."